Beginner's Guide: How to Solve a Rubik's Cube
Ready to turn that scrambled block into a solved masterpiece? This interactive tutorial teaches the classic Beginner Method. Expect about 10 minutes of reading, then it's practice time!
Last reviewed: by the Cubzor Editorial Team.
What You'll Learn
- The 7 simple stages of the Beginner Method.
- Essential Rubik's Cube algorithms.
- Finger-trick tips to speed up your solves.
- Step-by-step visual demos and quick-reference algorithms.
Understanding the Rubik's Cube: Core Concepts
Before diving into solving, let's understand three fundamental principles:
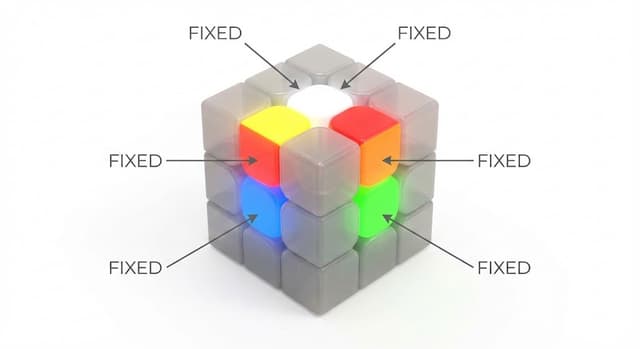
Center Pieces Are Fixed
- ✓The six center pieces (white, yellow, red, orange, blue, green) never change position
- ✓They define which color belongs on which face
- ✓Use them as reference points throughout the solve
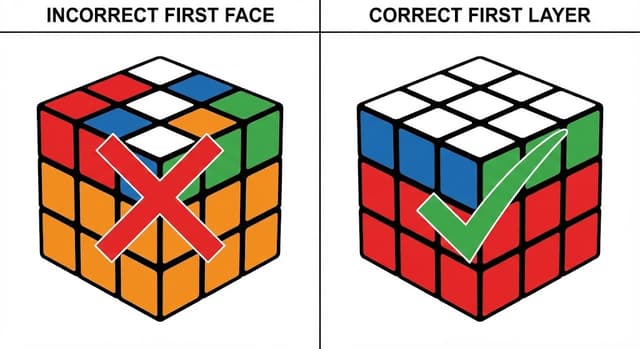
Solve Layer-by-Layer, Not Face-by-Face
- ✓Common mistake: trying to complete one entire face
- ✓Correct approach: complete each layer (including side colors)
- ✓Each layer builds upon the previous one
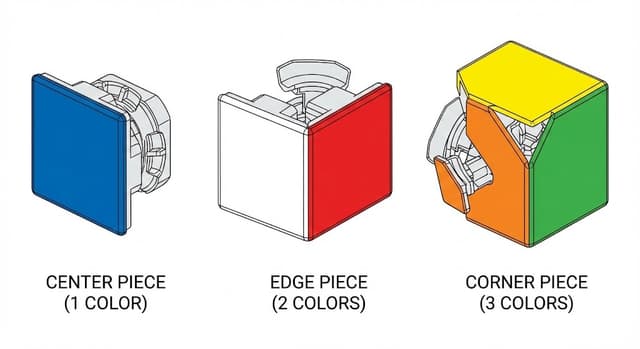
Three Piece Types
- ✓Centers: 6 pieces, 1 color each (fixed in place)
- ✓Edges: 12 pieces, 2 colors each
- ✓Corners: 8 pieces, 3 colors each
Reading Cube Notation: Your Algorithm Language
All algorithms use letter notation. Learn this "language" before starting:
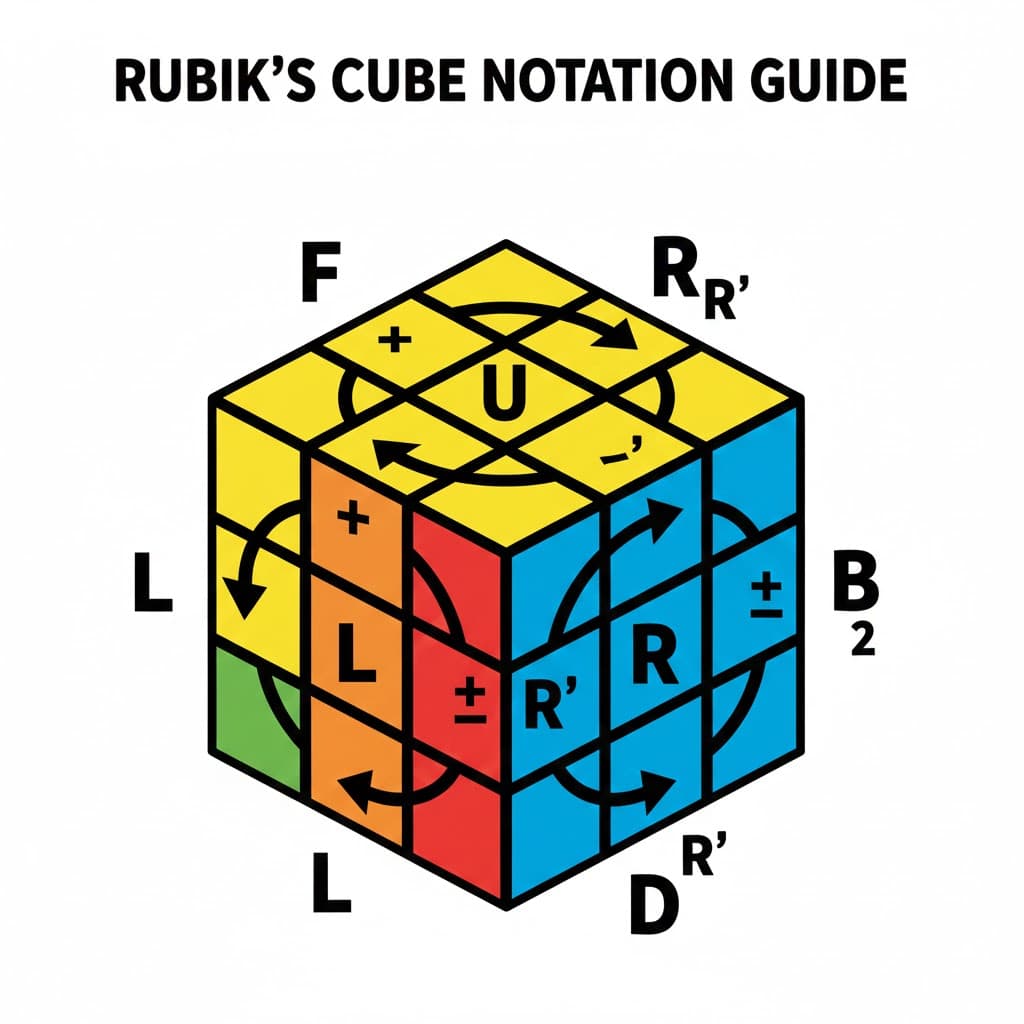
🎯The Letters:
Fface toward youRright-hand faceUtop faceLleft-hand faceDbottom faceBface away from you⚡The Symbols:
RR = Turn right face clockwise 90°R'R' = Turn right face counterclockwise 90° (apostrophe = counter)R2R2 = Turn right face 180° (direction doesn't matter)The 7-Step Roadmap
Follow these steps. Click each one to see it happen live on the interactive cube!
The cube has 6 faces and 3 layers. For notation, you'll see letters like R (right) or U (up). A prime (') means counter-clockwise. Think of R' like turning a book page backward.
Show Interactive Cube (Click to Explore)
Loading interactive cube...
Goal: Make a plus sign on the white face with matching side colors. No algorithms yet — just intuitive edge-piece moves. If an edge is in the right slot but flipped, take it out to the bottom layer, rotate the bottom until the edge is under its correct position with the white sticker facing you, then bring it up with a different turn so the white sticker ends up on top.
Insert the four white corners to finish the first layer. Find a white corner piece on the bottom layer directly below its target slot. Use R U R' U' until the corner inserts correctly. If the corner is in the top layer but twisted or in the wrong spot, use the same four-move trigger to move it out, then set it up again.
Show Interactive Example: Insert Corner
Loading interactive cube...
Solve the middle layer edges. Find an edge piece on the top layer that belongs in the middle layer (it won't have yellow on it). Position it above its matching center color. Then, use one of the algorithms below depending on whether it needs to go left or right.
Show Interactive Example: Insert Edge to Right
Loading interactive cube...
Show Interactive Example: Insert Edge to Left
Loading interactive cube...
Form a yellow cross on the top face. Hold the cube so the L is in the top-left corner or the line is horizontal, then apply F R U R' U' F'.
Show Interactive Example: Forming the Yellow Cross
Loading interactive cube...
Make the entire top face yellow. This step has multiple corner-orientation cases; the demo shows the Sune case R U R' U R U U R'. If your pattern is different, use the matching two-look OLL corner case before continuing.
Show Interactive Example: Orienting Corners
Loading interactive cube...
Position the yellow pieces correctly using corner and edge permutations to finish the solve.
Corner Cycle (A-perm)
Loading interactive cube...
Finally, permute the edges with a U-perm to complete the cube.
U-perm ↻
Loading interactive cube...
U-perm ↺
Loading interactive cube...
And boom — cube solved! 🎉
Fix a specific beginner step
Open the focused guide for the exact step that looks wrong on your cube.
Complete Beginner Method Algorithms
| Step | Goal / Action | Algorithm / Key Moves | Notes |
|---|---|---|---|
| Meet the Cube 🧊 | Understand Faces & Notation | R L U D F B | Basic face turns (clockwise) and their primes. |
| White Cross ⚪ | Form White Cross on Top | (Intuitive) | Match edge colors to side centers. Take a flipped edge out to the bottom and rotate it back into place to flip the white sticker upward. |
| White Corners 🏁 | Insert White Corners | R U R' U' | Use the four-move trigger repeatedly until the corner inserts correctly. |
| Middle Layer Edges ➗ | Edge to Right | U R U' R' U' F' U F | Moves edge from top to middle right. |
| Edge to Left | U' L' U L U F U' F' | Moves edge from top to middle left. | |
| Yellow Cross ✨ | Form Yellow Cross on Top | F R U R' U' F' | Repeat until cross appears. |
| Orient Yellow Corners (OLL) 🎯 | Make Top Face Yellow (OLL) | R U R' U R U U R' | Use the matching OLL corner case; Sune is shown as one example. |
| Permute Last Layer (PLL) 🏆 | Position Yellow Corners (A-perm) | R' F R' B B R F' R' B B R R U U | Cycles three corners. |
| Position Yellow Edges (U-perm) | R R U R U R' U' R' U' R' U R' / R U' R U R U R U' R' U' R R | Cycles three edges. |
Common Mistakes Beginners Make
Solving Face-by-Face Instead of Layer-by-Layer
Wrong: Completing all white stickers without checking sides
Right: Each edge and corner must match adjacent center colors
Not Learning Notation First
Skipping notation makes algorithms confusing. Spend 5 minutes mastering F, R, U, L, D, B before starting.
Moving Already-Solved Pieces
When inserting a corner or edge, algorithms temporarily disrupt solved pieces. Trust the algorithm—they return to place!
Forgetting Algorithms Mid-Execution
Write down algorithms on paper while learning. Use our interactive demos to practice step-by-step.
Rotating the Cube Too Much
Hold the cube with white on top and green toward you. Only rotate when instructions specify.
Giving Up After First Attempt
Every cuber struggles initially. Your first solve might take hours—that's completely normal and part of the learning journey.
Learning from Multiple Sources Simultaneously
Stick with one guide until you complete your first solve. Different guides use different color schemes and can cause confusion.
Using a Low-Quality Cube
A stiff, poorly-made cube makes learning frustrating. Consider investing $10-15 in a modern speed cube for a smoother learning experience.
FAQs & Pro Tips
Our simulator lets you visualize moves instantly, try algorithms step-by-step, and practice without a physical cube. It highlights pieces and guides you through sequences, accelerating your learning curve.
The practice simulator can time solves on your device, but this repo does not currently include accounts or cloud progress sync. Track your best times locally or in a separate timer log.
Use Practice Mode to time solves, then compare against your own averages. For official competition results and rankings, check the World Cube Association records and rankings.
Definitely! You can navigate to the specific algorithm pages (like OLL or PLL) to use the interactive simulators for targeted practice. You can also use the Practice Mode to repeatedly scramble and solve, focusing on the steps you need to improve.
Most people complete their first solve within 4-6 hours of practice. With consistent practice, you'll be able to solve it comfortably in 2-4 minutes within 1-2 weeks. Speed comes with time and advanced methods.
If your cube seems unsolvable, it may have been disassembled and reassembled incorrectly. Check if all center pieces are in their correct positions. If the cube was never disassembled, it's always solvable—just keep following the steps!
While you can learn on any cube, modern speed cubes ($10-15) turn much more smoothly than vintage Rubik's brand cubes, making learning less frustrating and algorithms easier to execute.
The beginner method uses intuitive steps and fewer algorithms (7-8 total), making it perfect for learning. Full CFOP is an advanced method with roughly 119 cases to understand or memorize across cross planning, 41 F2L cases, 57 OLL cases, and 21 PLL cases.
The last layer is the most algorithm-heavy step. Make sure you're orienting the cube correctly before each algorithm, and practice the sequences slowly until they become muscle memory.
For the beginner method, learning both versions is helpful but not required. As you advance to speedcubing, mirror algorithms become more important for efficiency.
Absolutely! The beginner method works starting with any color. White is conventional because it's easy to see, but you can start with any face and follow the same layer-by-layer approach.
Check that opposite faces follow the standard color scheme: white opposite yellow, red opposite orange, blue opposite green. If this isn't the case, the cube may have been incorrectly assembled.
🚀 Next Moves
Learning Resources
- World Cube Association (WCA)– Official competition rules, results, and upcoming events.
- SpeedSolving.com Wiki & Forum– A vast resource for methods, algorithms, hardware, and community discussion.
- SpeedCubeShop– Popular online store for speedcubes, lubricants, and accessories.
- TheCubicle– Another major online retailer for all things cubing.