4×4 Anfänger-Anleitung: Wie man den Rubik's Revenge löst
Der 4×4 Rubik's Cube (Rubik's Revenge) ist die nächste Herausforderung nach dem Meistern des 3×3! Mit beweglichen Zentren und Kantenpaarung führt er neue Konzepte ein, während er auf dem aufbaut, was Sie bereits wissen. Bereit für das nächste Level?
Was Sie lernen werden
- Die Reduktionsmethode: 4×4 lösen, indem man ihn in einen 3×3 umwandelt
- Zentrumslösungsstrategien für alle 6 Seiten
- Kantenpaarungstechniken zur Erstellung von 12 gepaarten Kanten
- Wie man Paritätsfehler erkennt und behebt
Den 4×4 Würfel verstehen: Kernkonzepte
Der 4×4 führt mehrere neue Konzepte ein, die beim 3×3 nicht existieren:
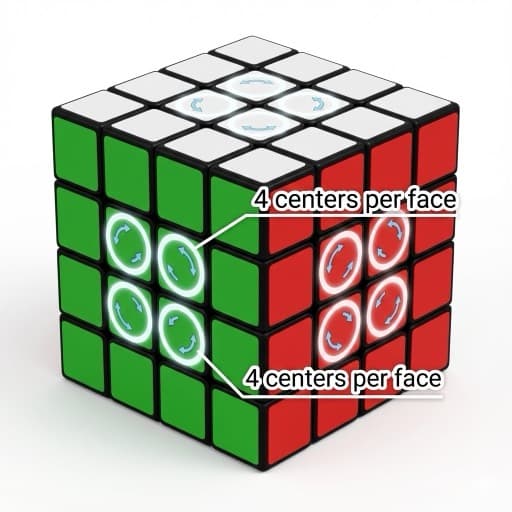
Bewegliche Zentren (Anders als 3×3)
- ✓Der 4×4 hat 24 Zentrumsstücke (4 pro Seite), die sich bewegen können
- ✓Sie müssen zuerst die Zentren lösen, um das Farbschema festzulegen
- ✓Zentren können durcheinandergebracht werden und müssen wieder zusammengesetzt werden
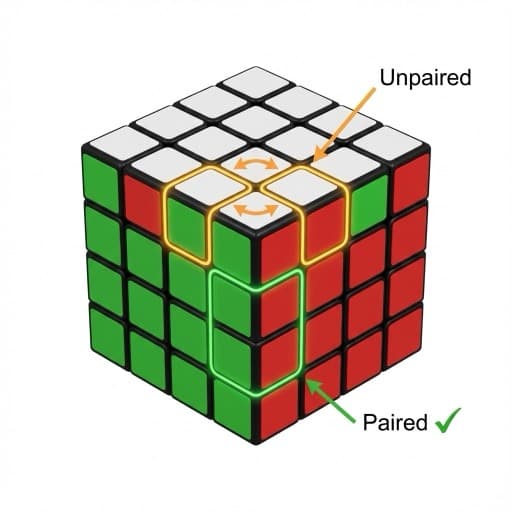
Kantenpaarung ist erforderlich
- ✓Der 4×4 hat 24 Kantenstücke, die zu 12 Doppelkanten gepaart werden müssen
- ✓Kantenpaarung ist der zeitaufwändigste Schritt für Anfänger
- ✓Nach der Paarung verhalten sich die Kanten wie 3×3-Kanten
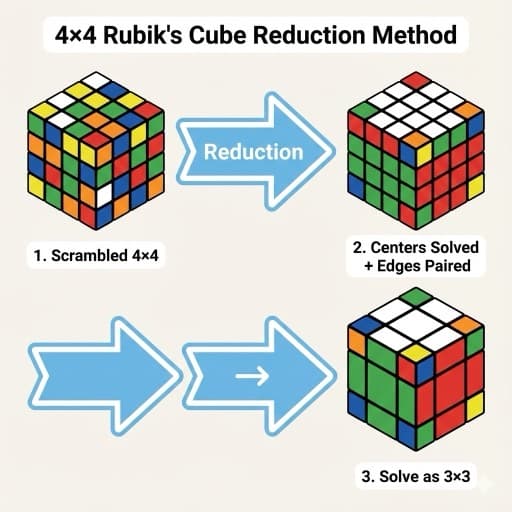
Die Reduktionsmethode
- ✓Zuerst Zentren lösen (6 Zentrumsblöcke mit je 4 Stücken)
- ✓Alle Kanten paaren (insgesamt 12 gepaarte Kanten)
- ✓Den resultierenden 'virtuellen 3×3' mit Ihrer 3×3-Methode lösen
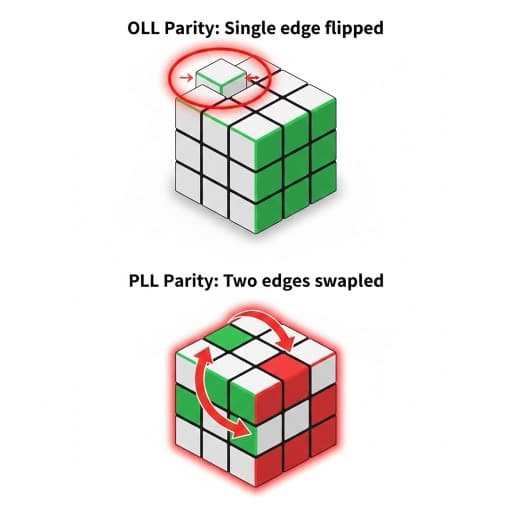
Paritätsfehler (Neue Herausforderung)
- ✓Würfel mit gerader Schichtanzahl (4×4, 6×6) können unlösbar erscheinende Zustände haben
- ✓Zwei Typen: OLL-Parität (ein gekipptes Dedge) und PLL-Parität (ein unmöglicher Tausch der letzten Ebene, etwa zwei Ecken oder zwei Kanten)
- ✓Spezielle Algorithmen existieren zur Paritätsbehebung—es ist kein Fehler!
4×4 Notation lesen: Über die Grundlagen hinaus
Der 4×4 verwendet alle Standard-3×3-Notation plus neue Züge für innere Schichten:
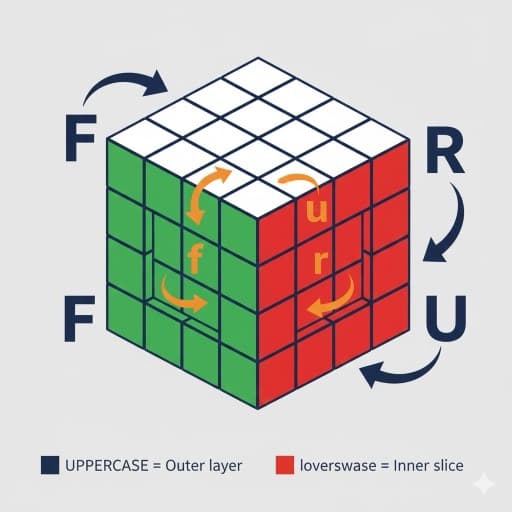
🎯Grundlegende Seitenzüge (wie beim 3×3):
Fäußere VorderseiteRäußere rechte SeiteUäußere obere SeiteLäußere linke SeiteDäußere untere SeiteBäußere Rückseite🔄Innere Schichtzüge (NEU für 4×4):
2Rzweite Schicht von rechts2Lzweite Schicht von links2Uzweite Schicht von oben2Dzweite Schicht von unten2Fzweite Schicht von vorne2Bzweite Schicht von hinten↔️Breite Züge (2 Schichten):
RwRw - äußere R-Fläche und angrenzende innere Schicht zusammen drehen (2 Schichten)LwLw - äußere L-Fläche und angrenzende innere Schicht zusammen drehen (2 Schichten)Wide-Züge drehen 2 Ebenen gemeinsam (außen + innen)
⚡Die Symbole:
RR = Rechte Seite 90° im Uhrzeigersinn drehenR'R' = Rechte Seite 90° gegen den Uhrzeigersinn drehen (Apostroph = gegen)R2R2 = Rechte Seite 180° drehen (Richtung egal)Die 4-Schritte-Reduktionsmethode
Dies ist der anfängerfreundliche Ansatz zum Lösen des 4×4. Befolgen Sie diese Schritte der Reihe nach:
Ziel: Sechs solide 2×2 Zentrumsblöcke erstellen, einen für jede Farbe. Beginnen Sie mit weißen Zentren, dann gelb (gegenüberliegende Seite), dann die vier Seitenfarben. Verwenden Sie intuitive Züge, um Zentrumsstücke zusammenzubringen. Tipp: Lösen Sie gegenüberliegende Farben zusammen (weiß/gelb, rot/orange, blau/grün), um die relative Positionierung beizubehalten. Verwenden Sie Schichtzüge (r, u, f), um Stücke zu bewegen, ohne fertige Zentren zu stören.
✓ Erfolgskontrolle: Alle 6 Seiten sollten solide 2×2 Zentrumsblöcke haben. Die Zentren legen Ihr Farbschema für den Rest der Lösung fest.
Ziel: Alle Kantenstücke zu 12 Doppelkanten-Paaren zusammenfügen. Finden Sie zwei passende Kantenstücke und bringen Sie sie in die obere Schicht. Verwenden Sie den Schicht-Kipp-Schicht-Algorithmus (r U r' oder Rw U Rw'), um sie zu paaren. Arbeiten Sie systematisch: Paaren Sie zuerst alle weißen Kanten (4 Paare), dann gelbe Kanten (4 Paare), dann verbleibende Mittelschichtkanten (4 Paare). Bewahren Sie fertige Paare in der unteren Schicht auf, um sie beim Arbeiten an neuen Paaren sicher zu halten.
✓ Erfolgskontrolle: Sie sollten 12 vollständig gepaarte Kanten haben. Jedes Paar verhält sich wie eine einzelne 3×3-Kante. Es sollten keine losen Kantenstücke übrig bleiben.
Ziel: Verwende deine 3x3-Anfängermethode, um den gepaarten Würfel zu lösen. Mit gelösten Zentren und gepaarten Kanten verhält sich der 4x4 wie ein 3x3. Nutze dieselbe Methode: weißes Kreuz, weiße Ecken, mittlere Ebene, gelbes Kreuz, gelbe Ecken orientieren und letzte Ebene permutieren. Behandle jeden Zentrumsblock als ein Zentrum und jedes Kantenpaar als eine Kante. Wenn eine scheinbar unmögliche Situation erscheint, etwa ein gekipptes Dedge oder ein unmöglicher Tausch der letzten Ebene, hast du Parität und korrigierst sie in Schritt 4.
✓ Erfolgskontrolle: Der Würfel sollte gelöst aussehen, oder du triffst auf Parität. Wenn du ein gekipptes Dedge oder einen unmöglichen Tausch der letzten Ebene siehst, fahre mit Schritt 4 fort.
Ziel: Parity-Fehler beheben, die den Abschluss verhindern. Zwei häufige Reduktions-Parities sind OLL-Parity (ein geflipptes Dedge, das auf 3x3 nicht vorkommt) und PLL-Parity (ein unmöglicher Last-Layer-Tausch auf 3x3, etwa zwei Ecken oder zwei Kanten). OLL-Parity wird häufig mit Rw U2 x Rw U2 Rw U2 Rw' U2 Lw U2 Rw' U2 Rw U2 Rw' U2 Rw' behoben. PLL-Parity wird häufig mit 2R2 U2 2R2 Uw2 2R2 Uw2 behoben. Notationshinweis: Der OLL-Algorithmus nutzt Wide Moves wie Rw/Lw, während dieser PLL-Algorithmus innere 2R-Notation plus Uw-Züge nutzt. Übe sie langsam aus der Algorithmustabelle, bevor du Solves timest.
⚠️ Wichtig: Parity-Fehler treten nur auf geradzahligen Cubes auf (4×4, 6×6 usw.). Wenn du während der 3×3-Phase eine scheinbar unmögliche Situation siehst, erkenne zuerst, ob es OLL- oder PLL-Parity ist, führe den passenden Algorithmus langsam aus und mache dann weiter.
✓ Erfolgskontrolle: Herzlichen Glückwunsch! Ihr 4×4 Würfel sollte jetzt vollständig gelöst sein. Alle Zentren sind solide 2×2 Blöcke, alle Kanten sind gepaart und korrekt positioniert, und alle Ecken sind an ihrem Platz.
Vollständige 4×4 Reduktionsmethoden-Algorithmen
| Schritt | Ziel / Aktion | Algorithmus / Schlüsselzüge | Hinweise |
|---|---|---|---|
| Schritt 1: Alle 6 Zentren lösen | Alle 6 Zentren lösen (2×2 Blöcke) | (Intuitive) | Verwenden Sie intuitive Züge und Schichtzüge (r, u, f). Lösen Sie gegenüberliegende Farben zusammen. |
| Schritt 2: Alle 12 Kanten paaren | Alle 12 Kanten paaren | Rw U Rw' | Grundpaaren: r U r'. Bewahren Sie fertige Paare in der unteren Schicht auf. |
| Schritt 3: Wie einen 3×3 Würfel lösen | Als 3×3 Würfel lösen | (Use 3×3 Method) | Verwenden Sie Ihre vollständige 3×3-Anfängermethode. Behandeln Sie Zentrumsblöcke und Kantenpaare als einzelne Stücke. |
| Schritt 4: Paritätsfehler beheben (falls nötig) | Paritätsfehler beheben (falls aufgetreten) | OLL: Rw U2 x Rw U2 Rw U2 Rw' U2 Lw U2 Rw' U2 Rw U2 Rw' U2 Rw'PLL: 2R2 U2 2R2 Uw2 2R2 Uw2 | OLL-Parity nutzt Wide Moves wie Rw/Lw für ein geflipptes Dedge. PLL-Parity nutzt hier innere 2R-Notation plus Uw-Züge für unmögliche Last-Layer-Tausche. Nicht jeder Solve braucht einen dieser Fixes. |
Häufige Fehler von Anfängern
Zentren nicht zuerst lösen
Lösen Sie immer zuerst die Zentren vor den Kanten! Ohne feste Zentren (wie beim 3×3) müssen Sie zuerst das Farbschema festlegen. Der Versuch, Kanten vor Zentren zu paaren, führt zu Verwirrung und verschwendeter Mühe.
Gepaarte Kanten während der 3×3-Phase zerstören
Nach dem Paaren der Kanten können diese noch auseinandergebrochen werden, wenn Sie innere Schichten (r, l, usw.) drehen. Verwenden Sie während der 3×3-Lösungsphase nur äußere Seitenzüge (R, L, U, D, F, B).
Panik bei Paritätsfehlern
Ein gekipptes Dedge oder ein unmöglicher Tausch der letzten Ebene ist kein normaler 3x3-Fall. Es ist Parität auf dem 4x4. Wende den passenden Paritätsalgorithmus an und fahre fort.
Ineffiziente Kantenpaarung
Suchen Sie nicht zufällig nach Kantenstücken. Arbeiten Sie systematisch: Vervollständigen Sie zuerst alle weißen Kanten, dann gelbe, dann Mittelschichtkanten. Bewahren Sie fertige Paare sicher in der unteren Schicht auf.
Keine Schichtzüge für Zentren verwenden
Der Versuch, Zentren nur mit äußeren Schichtzügen zu lösen, ist extrem ineffizient. Lernen Sie, innere Schichtzüge (r, l, u, d, f, b) zu verwenden, um Zentrumsstücke zu bewegen, ohne andere Zentren zu stören.
FAQs & Profi-Tipps
Ja, der 4×4 ist anspruchsvoller, weil er Zentrumslösung, Kantenpaarung und Umgang mit Parität erfordert. Wenn Sie jedoch die 3×3-Methode kennen, ist die Kernlösungsphase identisch. Der größte Teil der zusätzlichen Schwierigkeit kommt von den Vorbereitungsphasen (Zentren und Kanten).
Wenn Sie bereits den 3×3 können, erwarten Sie, Ihre erste 4×4-Lösung in 1-3 Stunden konzentrierter Übung zu schaffen. Nach einer Woche regelmäßiger Übung können die meisten Menschen ihn konstant in 5-10 Minuten lösen. Geschwindigkeit kommt mit Erfahrung.
Parität ist eine Situation auf Würfeln mit gerader Ebenenzahl wie 4x4 und 6x6. Bei der Reduktion ist OLL-Parität ein gekipptes Dedge und PLL-Parität ein unmöglicher Tausch der letzten Ebene. Beide Typen können unabhängig auftreten.
Nein. Du behebst Parität nur, wenn sie auftritt. OLL- und PLL-Parität sind getrennte Fälle, daher kann eine Lösung eine, beide oder keine haben.
Beginne mit der Standard-Reduktionsmethode. Wenn du konstant lösen kannst, erkunde fortgeschrittene 4×4-Ansätze in vertrauenswürdigen Speedsolving-Ressourcen, aber halte diesen Guide zuerst auf die Reduktionsgrundlagen fokussiert.
Während der 3×3-Lösungsphase dürfen Sie nur äußere Schichten drehen (R, L, U, D, F, B). Das Drehen innerer Schichten (r, l, u, d, f, b) wird Ihre Kantenpaare zerstören! Achten Sie darauf, welche Schichten Sie drehen.
Eine gute Reihenfolge ist: Weiß → Gelb → Rot → Orange → Blau → Grün. Gegensätzliche Farben nacheinander zu lösen hilft, ihre relative Position zu erhalten. Fortgeschrittene Solver können andere Center-Reihenfolgen nutzen, aber diese bleibt für die Anfängerreduktion vorhersehbar.
Üben Sie diese Tipps: (1) Vorausschauen—finden Sie Ihr nächstes Kantenpaar, während Sie das aktuelle lösen. (2) Verwenden Sie effiziente Schichtzüge anstatt den ganzen Würfel zu drehen. (3) Bewahren Sie fertige Paare sicher unten auf. (4) Lernen Sie fortgeschrittene Paarungstechniken wie 3-2-3 Kantenpaarung.
Ja! Nach der Reduktion (Zentren + Kanten) können Sie jede 3×3-Methode Ihrer Wahl verwenden. CFOP, Roux, ZZ—sie funktionieren alle. Denken Sie nur daran, nur äußere Schichten zu drehen, um Ihre Kantenpaare zu erhalten.
Du hast mehrere Wege: (1) Deine Reduktionssolves flüssiger machen. (2) Fortgeschrittene Parity-Algorithmen für schnellere Fixes lernen. (3) Andere Guides im Lernhub erkunden. (4) Mit Speedsolving beginnen und auf Sub-2-Minuten-Zeiten hinarbeiten.
🚀 Nächste Schritte
Lernressourcen
- World Cube Association (WCA)– Offizielle 4×4-Wettbewerbsregeln und Weltrekorde.
- SpeedSolving.com Wiki– Fortgeschrittene 4×4-Methoden, Paritätsalgorithmen und Community-Diskussion.